Reading Test Output
Tests can verify if code does what is expected. Tests can also provide information to you, the programmer, about where and how code breaks. In this class, we’ve tried to make our tests as useful and accessible to you as possible, while also not straying too far from what you might encounter in other environments such as research or industry.
To run the tests for a project, you must first click on any file within the project’s folder. Then, you should click on the beaker symbol on the top right corner of Visual Studio Code. Two options will pop up: “Run ALL Tests” and “Run Code Quality Tests.” Click on the option corresponding to the tests you wish to run.

The “Run Code Quality Tests” option will thoroughly check your code for code quality. When there is a failure, there will be text in your terminal stating the issue(s) and the file and line number at which it occurs. For example, if there are TODO comments in the code, your terminal may look like this:

When all code quality tests pass, there will be no additional text, only a blank empty line, in the terminal appearing as they run. Your terminal may look like the following:

Your code can be submitted to gitlab if and only if all code quality tests pass!
The “Run ALL Tests” option. The tester runs all the tests until there’s a failure in sequence. If there are D, C, B, and A tests for a project, then the tester will run all the D tests, then all the C tests, then all the B tests, and then all the A tests. When there is a failure, you will see a message display in your terminal. For instance, if your code for the function do_thing() in the D tests does not work, you will see the message FAILED during D Tests when testing do_thing(). “Reading Test Results” has more information on how to intepret these message displays.
When all your tests pass, you will see a green message in the terminal. For instance, if a project has D, B, and A tests, and you write and pass all of them, then your terminal will look like the picture below:

If you choose, for instance, to only complete up to the D and B tests, then your terminal will look like this picture below:
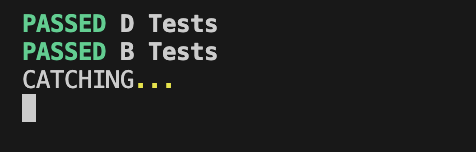
“CATCHING” means that the tester has found an error, and soon it will display a FAILED during A Tests message.
Reading Test Results: When Tests Don’t Pass
You will continuously see tests run in the terminal until a test fails. Tests stop running after the first failure. When a test fails, you will see “CATCHING…” in your terminal as the tester “catches” the failure, and then you will see a message display like the one below.
You might have an infinite loop in your code; i.e., a section of your code might never stop running, and so the test won’t stop running.
You might want to double check any while loops you have, but if you aren’t sure what to look for,
feel free to come to Office Hours!
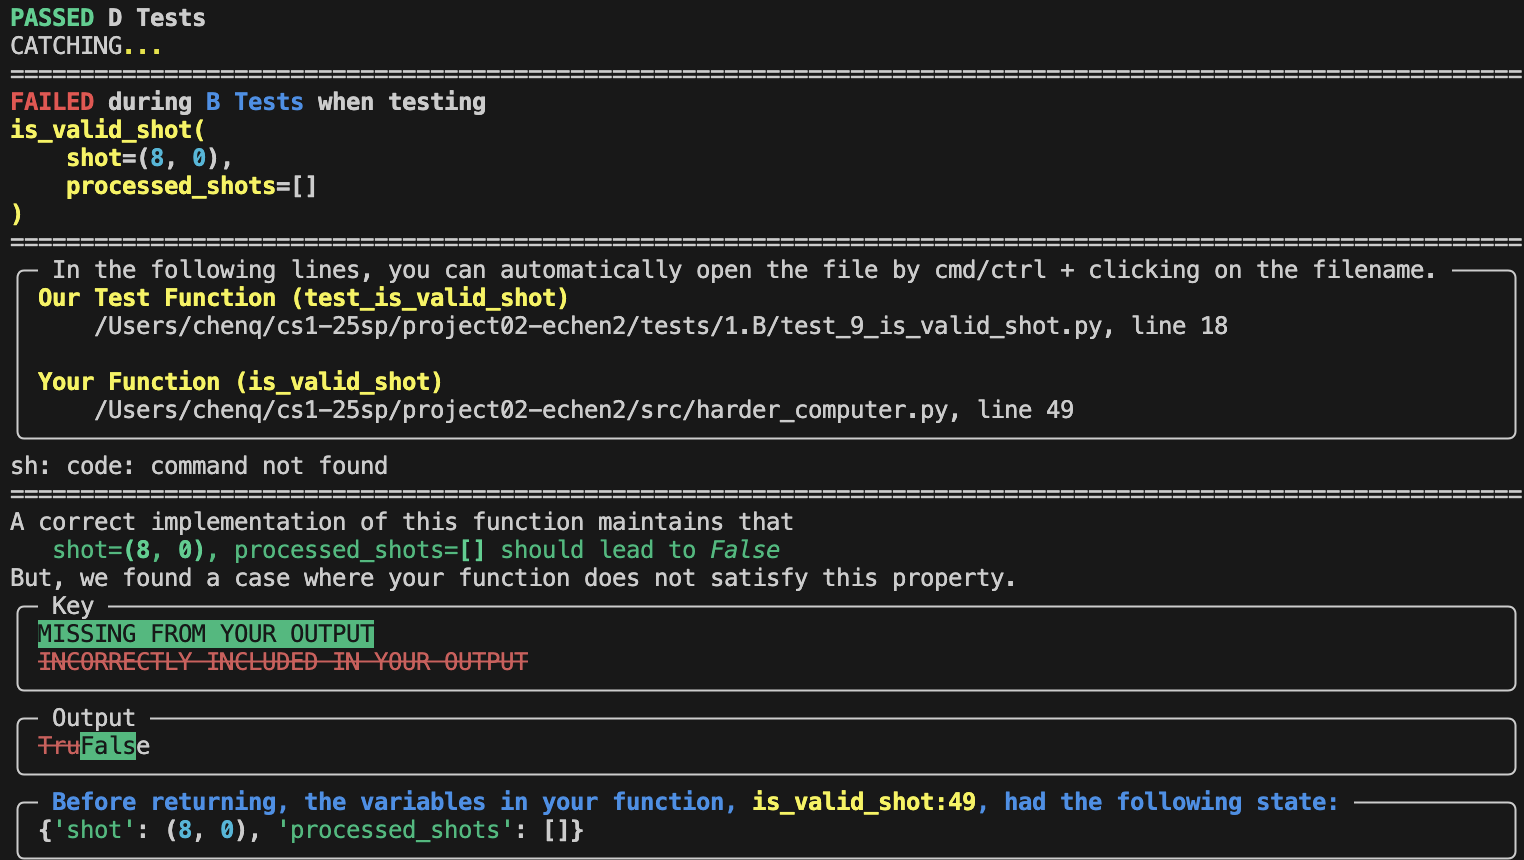
The very top of the error message tells you which function failed in which test case. In this picture, we can see that our code “FAILED during B Tests” when testing the is_valid_shot function for the test case where the argument shot was (8, 0) and the argument processed_shots was [].
The box starting with “In the following lines” allows us to easily click to the function you wrote, as well as the test in the test file.
The section starting with “A correct implementation of this function maintains that” tells us what the expected output for this test case was. In the “Output” box, we can see which parts of the expected output we were missing (green) and which incorrect parts our output had (red). This is useful when the type of the output is something like a list or a set. In this case, we see that the expected output was False and our output was True. Hence, we can conclude that the output of calling is_valid_shot(shot=(8, 0), processed_shots=[]) should have been False, but our code outputted True.
The bottommost section starting with “Before returning, the variables in your function” tells us the state of the variables right before failure. This can be helpful; if the values of shot and processed_shots had changed in the code for the function, for instance, it would be useful to see if at some point, their values were not what you would expect.
All the above components of the message display give you the necessary information for a starting point for debugging.
Sometimes, there might be a different type of message display. The above occurs when your output does not match our expected output. If your code has an error, you will see a message display like the one below.
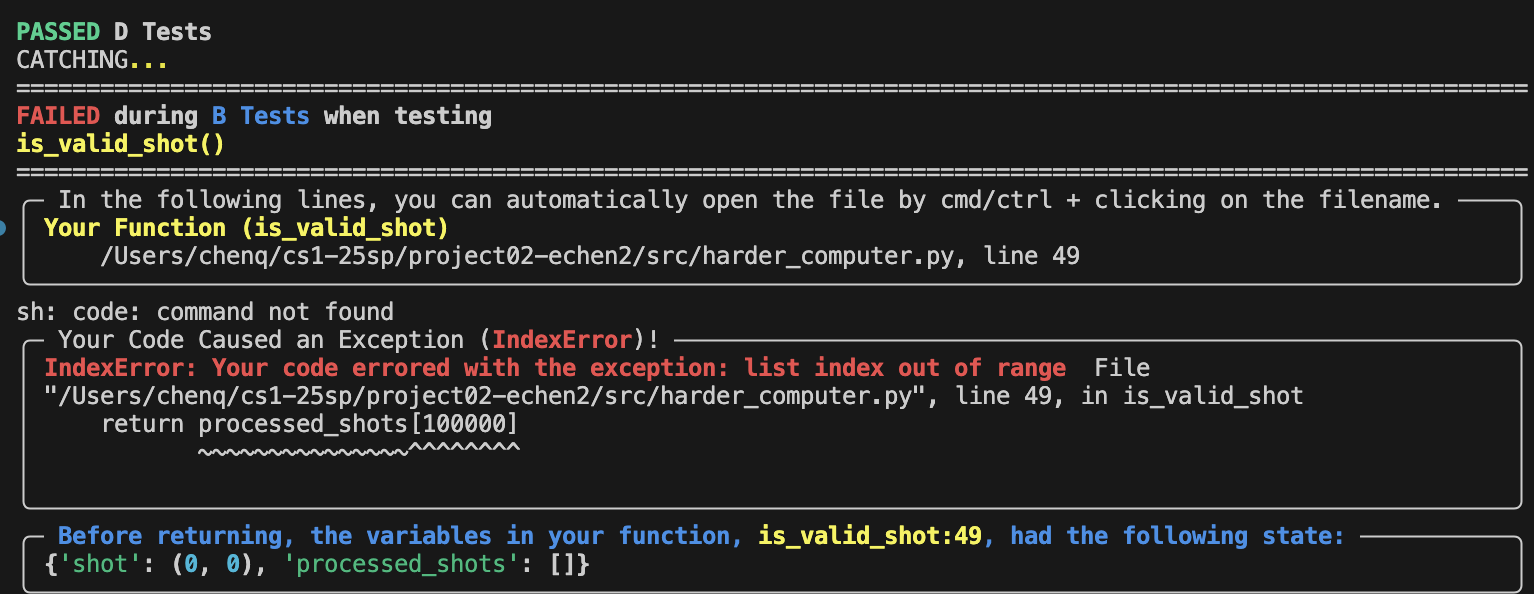
Here, we see some similarities to the picture we saw above. Again, we are told which function the error is in, which once again is is_valid_shot. The tester tells us IndexError: Your code errored with the exception: list index out of range, letting us know exactly what the error is. It also shows us the code for the line that caused the error. In this case, the line is trying to access processed_shots[100000]; it is trying to access index 100000 of the list processed_shots. We can assume that this list does not have more than 100000 elements, so we are trying to access a list index that is out of bounds. Similarly to in the picture above, the components of this message display also give you a starting point for debugging.
If you have any questions about anything covered here, feel free to come to Office Hours! All of the TAs are happy to help you read error output that’s difficult to understand.