Goals and Outcomes
In this project you will create a simulation for a Newton’s Cradle (see visualization below). A Newton’s cradle is a series of pendula that display a “chain reaction” when each pendulum knocks into the pendulum next to it. This project involves some super cool - and fundamental! - physics concepts like angular momentum and conservation of momentum, which you can see in the Physics appendix. If you want some intuition for what you’re building in this project, we recommend skimming through this section now if you want to understand what you’re dealing with!
In this project, you will create a Newton’s cradle based on information drawn from your own CSV file!
The project uses VPython and pandas to implement the visualization.
Setup
Go to project registration to register for the project. Make sure to sign up for cs1-25sp projects on the left! Once you do, restart vscode and a folder with the starter code should automatically show up in your file browser.
Project Grading
Grading guidelines are outlined here!
What is a CSV file
A CSV file, which is an example of a filename extension, refers to any file ending in .csv. Filename extensions tell us the type of content contained in a file. For example, a file ending in .png tells us that the file is likely going to be an image while a file ending in .mp4 tells us that the file is likely going to be a video.
CSV stands for comma-separated values. The most common use of CSV files is to store and move tabular data (often done in the field of machine learning!). So a file ending in .csv tells us that the file is going to contain data best visualized in a table. Each line in a CSV file represents a data point. Each value in the line describes an attribute of that data point. The very first line in a CSV file contains the names of each attribute.
It is helpful to understand the contents of a CSV file by looking at one. Below, is an image of what a CSV file containing the information of CS1-25sp TAs looks like.
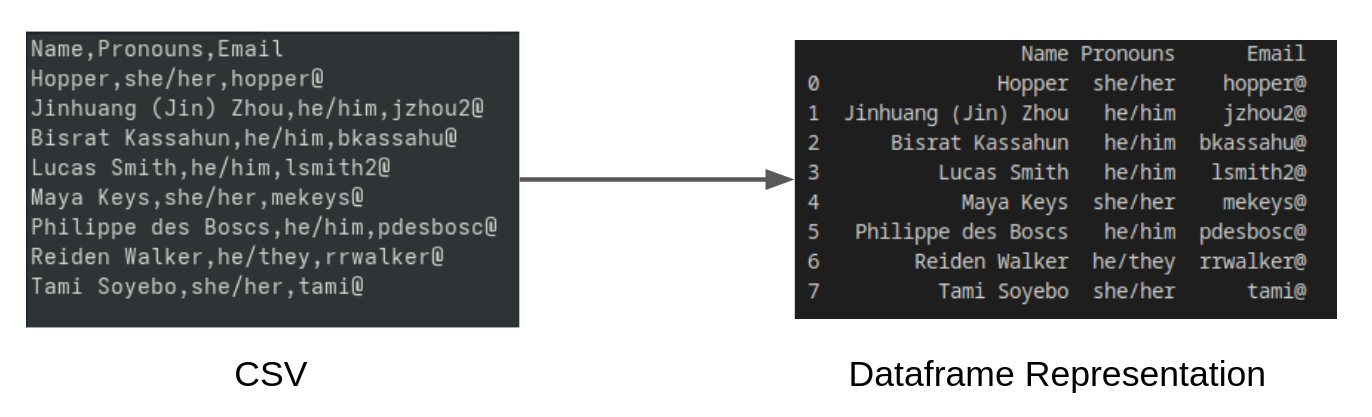
In the later parts of this project, you can edit a CSV file called newton_cradle_pends.csv that contains information about the pendulums you will be simulating in your Newton’s Cradle.
What is pandas
pandas is a library that is designed for data analysis since it allows us to create and manipulate dataframes (you can think of these as tables containing data) by reading CSV files.
What is VPython
VPython is a library that is designed to help write physics simulations, since it allows us to build and visualize objects, and also has a built-in mathematical library (including trigonometry, vectors and math operations).
VPython Objects
You can think of VPython’s box, sphere, and cylinder as the shapes that we get to see in the final visualization. Specifically, the shapes we use to create the pendulum are:
-
boxfor the axle (support) -
spherefor the bob (mass hanging in the pendulum) -
cylinderfor the cord (string of the pendulum)
To customize the bobs, we use VPython’s textures and colors, which are initialized in constants.py. The TEXTURE_MAP dictionary contains the textures, and the COLOR_MAP dictionary
contains the colors. These have been used in pendulum.py (which is provided to you), but you will end up working with these objects; so it is good to know where they came from!
When working with box, sphere, and cylinder, you can use their specific attributes to access information. For example, if we have ball = sphere(...), then we can use ball.radius to get
ball’s radius and ball.pos to get ball’s position (as a vector).
We have provided additional documentation on the attributes of various VPython objects if you would like to read it.
VPython Math
VPython uses vectors to define the axes and positions. It uses something called “operator overloading” to allow us to add and multiply vectors exactly like we do with numbers!
This is the same thing that allows us to use + with both strs and ints!
To find the magnitude of a given vector vec, you can use the function mag(vec). You can also directly use trigonometric functions like sin(theta) where theta is in radians.
Newton’s Cradle Simulation
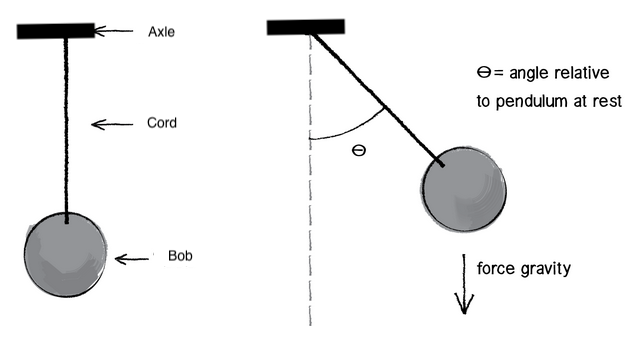
Before you write any code, it is important to understand what a pendulum is.
What is a pendulum
A pendulum is defined by the following 7 attributes:
- mass - the mass of the pendulum
- restitution_coeff - the “level” of inelasticity of collision when another object collides with this pendulum
- color - color of the pendulum
- texture - texture of the pendulum
- objects - the
Vpythonobjects (box,sphere,cylinder) that makes up the phyiscal representation of the pendulum - theta - the current angle of the pendulum
- omega - the current velocity of the pendulum
Representations of Newton’s Cradle
In this project we are representing a Newton’s Cradle in 2 ways. First, using a CSV file. Second, using a list of dictionaries that we will refer to as pend_list.
Using a CSV file enables a user of our simulation program to easily create and modify pendulums in their Newton’s Cradle without worrying about how the code works. While on the other hand, using a list of dictionaries called pend_list enables the programmer to easily work with the pendulums’ data.
In the CSV representation, the information of a single pendulum is stored on a line. Take a look at newton_cradle_pends.csv in src/.
In the list of dictionaries representation, each pendulum is represented by a dictionary in a list called pend_list. Each key is the name of a pendulum attribute and the value of a key is the value associated with that attribute.
A CVS to pend_list converter (D Tests)
Once you have understood how each pendulum is represented, you are ready to begin implementing the extract_and_convert function that converts the information representing a Newton’s Cradle in a CVS file to a pend_list! For this part, you will be working in pds_helper.py in src/. Implement the following function.
- We’ve provided you with the following line of code:
df = pd.read_csv(relative_filepath). In this line of code, we are assigning a dataframe created by pandas to the variabledf. We achieve this by calling theread_csv()function of pandas. The functionread_csv()takes in a relative_filepath to a CSV file and converts it into a dataframe. - We’ve also provided you with the following line of code:
bad_rep = df.to_dict(orient="index"). In this line of code, we are assigning a dictionary created by the functionto_dict()to the variablebad_rep. We achieve this by calling theto_dict()function of a dataframe created by pandas. The functionto_dict()takes in an argument calledorientwhich we have set the value to"index". Havingorient="index"means that each row of the dataframe is converted into a key-value pair where the key is an integer representing the row number and the value is a dictionary representing the attributes of the pendulum.
extract_and_convert(relative_filepath) (partially provided)
Creates and returns the list of pendulum dictionaries pend_list with the provided relative_filepath to a CSV file representing a Newton’s Cradle.
- You do not need to modify the provided starter code to complete the rest of this function.
- We highly encourage you to start by examining what the dataframe
dfand dictionarybad_replooks like by pressing the “triangle icon” on the top right ofvscodein thepds_tester.pyfile located in theproject04-[username]folder! Then, think about why the current representation of pendula in a Newton’s Cradle,bad_rep, is a bad representation.
Task 0.0.
Implement the function, extract_and_convert, as described above. The docstrings in the starter code will be helpful for you to get a hang of how things work.
Look at the value of each key in bad_rep. Is there another data structure that reduces the redundancy of the keys?
bad_rep a bad representation of pendula in a Newton’s Cradle compared to pend_list?
In essence, bad_rep and pend_list are the same because they both store attribute information about each pendulum in a Newton’s Cradle. However, as programmers, it is important to select the best data structure for each problem we are working on. The reason why a list of dictionaries, pend_list, is a better representation than bad_rep, a dictionary whose keys are integers and values are dictionaries, is because bad_rep uses more space (having to store both keys and values) than necessary. In bad_rep, each pendulum is represented by a key-value pair where the first key is 0, the second key is 1, and so on. We know which pendulum we are on by looking at by its key value. However, we do not need to store that information in a dictionary. In pend_list, we know which pendulum we are looking at by its index in the list. Please come to office hours and ask if this is at all confusing!
Task 0.5.
To test your code, make sure you are on a file (any file) within the project04 folder. Then, click the beaker on the top right side of vscode and select the Run ALL Tests option. The tester will run until failure. If your code is correct, your terminal will display: FAILED during D Tests when testing uniform_mass_newton_cradle().
Once the tests for extract_and_convert passed, feel free to press the “triangle icon” on the top right of vscode in the pds_tester.py file to see what a what the correct pend_list looks like!
We know this is only a brief introduction into pandas, if you want to learn more, here’s a short guide!
Pendulum Creation (D Tests)
We will now focus on actually building different types of pendulums from CSV files.
You will start by implementing four short functions in the file special_cradles.py:
uniform_mass_newton_cradle(relative_filepath, mass)
Returns a pend_list corresponding to the pendulums in a CSV file located at relative_filepath using a helper function from pds_helper.py, such that all the pendulum’s mass values are assigned the value mass.
uniform_e_newton_cradle(relative_filepath, e_val)
Returns a pend_list corresponding to the pendulums in a CSV file located at relative_filepath using a helper function from pds_helper.py, such that all the pendulum’s coefficients of restitution are assigned a provided e value.
elastic_newton_cradle(relative_filepath)
Returns a pend_list such that each pendulum has a perfectly elastic restitution coefficient value.
Hint: Do not duplicate code you’ve already written.
inelastic_newton_cradle(relative_filepath)
Returns a pend_list such that each pendulum has a perfectly inelastic restitution coefficient value.
Hint: Do not duplicate code you’ve already written.
Task 1.0.
Implement the functions uniform_mass_newton_cradle, uniform_e_newton_cradle, elastic_newton_cradle, and inelastic_newton_cradle as described above. The docstrings in the starter code will (still) be helpful for you to get a hang of how things work.
make_newton_cradle(relative_filepath, r_param, theta_init)
Creates the list of pendulum dictionaries pend_list, using a helper function from pds_helper.py, with the unique relative_filepath.
You should use the following algorithm:
- In a
forloop, update the following 3key: valuepairs of each pendulum dictionary inpend_list.-
theta: the angle of the pendulum with respect to normal (perpendicular to theaxle). It should betheta_initfor the first pendulum, and0for all the others. -
omega: the angular velocity, which should be0for all the pendula. -
objects: atupleof (axle,bob, andcord)VPythonobject that are the parts of the pendulum.
-
- Return the updated
pend_list.
Vpython objects for pendulums
- Use one relevant helper function from
pendulum.pyinsupport/to create thetupleof objects, which will be the value of the keyobjects. Pay attention to the type of each argument! - To find the ‘color’ and ‘texture’ strings of the pendulum from the CSV file, use the pendulum dictionary.
- Then, use
COLOR_MAPandTEXTURE_MAPrespectively (fromconstants.pyinsupport\) to find theVPythonanalog color and texture objects. - The axle position of the $i$th pendulum can be defined as
axle_pos = vector((-0.1+r_param/4 * i), r_param/5, 0).
Task 1.25.
Implement the remaining function, make_newton_cradle (also in the file special_cradles.py), as described above.
You can ignore those.
We’ve added some types so you can see which keys and values in your dictionary are required, but Pyright doesn’t always infer those types correctly. Feel free to ask if you are curious why.
Task 1.5.
To test your code, click the beaker on the top right side of vscode. Then, select the Run ALL Tests option. The tester will run until failure. If your code is correct, your terminal will now display PASSED D Tests before CATCHING....
Additionally, by running the D tests, you should be able to see a visualisation of the Newton’s cradle in your browser! Don’t worry if the visualisation only lasts a few seconds, or if the browser tab closes automatically. If the visualisation tab hasn’t closed in your browser, you can close it to end the tests.
Swing Implementation (C Tests)
In the second part of the project, you will focus on the functionality of each individual pendulum; specifically, how each pendulum swings. You will implement that functionality for the entire cradle. The following three functions are all located in the file swinging.py.
angle_update(omega, theta, r_param, dt, g)
Takes in the current values of angle theta ($\theta$) and angular velocity omega ($\omega$) and updates them for a given timestep dt and gravitational acceleration g. Returns a tuple of the new $(\omega_{new}, \theta_{new})$.
Task 2.
Write the function angle_update(omega, theta, r_param, dt, g) described above. You should refer to the section “Angular momentum and velocity” for the relevant physical equations to calculate $\theta_{new}$ $\omega_{new}$, using the given values for theta, omega, g, and the length of the cord r_param.
Task 2.5.
Like before, click on the beaker and follow the same steps as before. If your code is correct, your terminal should display: FAILED during C Tests when testing full_swing_update().
Next, you will write the function to update the each pendulum. We’ve provided a helpful function swing_update, which essentially performs a ‘swing’ of the pendulum.
It takes in the pendulum’s dictionary pend_dict, the length of the cord r_param, the time step dt, and the gravitational acceleration g and updates the angle and position of the pendulum components, using the helper function angle_update. The pend_dict is updated and nothing is returned.
full_swing_update(pend_list, r_param, dt, g)
Uses the helper function swing_update to each pendulum in the Newton’s cradle.
Hint: Use a for loop.
Task 3.
Write the function full_swing_update(pend_list, r_param, dt, g).
Task 3.5.
Like before, click on the beaker and follow the same steps as before. If your code is correct, all the C tests should be passing and your terminal will display: Passed D Tests and Passed C Tests before Catching.... Ensure this is the case before moving on to the next section!
Handling Collisions (B Tests)
In this part of the project, you will focus on what happens to the pendula when they knock into each other, which lies at the heart of the Newton’s cradle demonstration. Everything from now on will need to be written in visualize_cradle_run.py.
Specifically, you will implement the handle_collision function to the following specification:
handle_collision(e, omega1, omega2, m1, m2, r_param)
Takes in the initial angular velocities of both bobs (omega1 and omega2), their coefficient of restitution (e), their masses (m1 and m2),and the cord length r_param and returns a tuple of the new angular velocities of both bobs (new_omega1, new_omega2).
Task 4.
Implement handle_collision(e, omega1, omega2, m1, m2, r_param). You can refer to the section “Conservation Laws” for information on how to implement the physics of this.
Task 4.5.
Follow the same instructions for the tests as before. If your code is correct, your terminal will display: FAILED during B Tests when testing handle_two_bobs().
Now we get to the longest function you will have to write, but we can break it down.
handle_two_bobs(pend1, pend2, r_param)
Handles the pairwise interactions between two bobs in the Newton’s cradle, including checking for and handling collisions.
Takes in two dictionaries (pend1 and pend2), representing the two pendula in the interaction.
As a reminder, you can access positions and radii of VPython objects with bob.pos and bob.radius, and magnitude using mag(vec).
- For each pendulum dictionary, get the masses, bobs and angular velocity (
omega). - From only the first dictionary, get the coefficient of restitution.
- Check if the magnitude of the difference in positions of both bobs is less than or equal to
1.05times the sum of the bobs’ radii. We add a little bit of buffer to what is considered a ‘collision’.- If
true, use the helper functionhandle_collisionto get the new angular velocity values for both pendula. - Then, update both dictionaries with their respective new
omegavalues.
- If
Task 5.
Implement the function handle_two_bobs(pend1, pend2, r_param) as described above.
Task 5.5. Follow the same instructions for the tests as before. At this point, all the B tests should be passing with your code!
Running the Simulation (A Tests)
This is where you put everything you have written so far to use. Finally, in this part of the project, you will put everything together and get to see your simulation!
newton_cradle_tick(pend_list, r_param, dt, g)
Performs a single timestep or tick of the Newton’s cradle.
- Update the swings of all the pendula (Hint: Use a function you already wrote!)
- For each pendulum (except the last) handle the pairwise interaction of that pendulum and the one after it. (Hint: Use another function you already wrote!)
Task 6.
Implement the function newton_cradle_tick(pend_list, r_param, dt, g) as described above.
Task 6.5.
As you have done previously, click the beaker on the top right of vscode and select Run ALL Tests. Make sure you are passing all the A tests!
if __name__ == "main" (partially provided)
Runs when you press the triangular play button at the top right corner of your vscode window. It is the culmination of all the helper functions you have written,
and creates the Newton’s cradle visualisation from data in the CSV file called newton_cradle_pends.csv which is stored in the variable NC_FP.
- Use a helper function you wrote before to create the
pend_listthat you will use for the entire Newton’s cradle. Remember to use the appropriate constants fromconstants.pywhen calling this function! - In the (partially provided)
whileloop (i.e., while the simulation is still running), call a helper function with arguments fromconstants.pyto perform a single tick of the Newton’s cradle.
Task 7. Finish implementing the main run sequence of the Newton’s Cradle Simulation, using the appropriate helper functions you wrote before.
There are no automated tests for task 7! You will have to run the simulation to make sure everything is working!
Task 7.5.
It’s time to run your simulation! Open visualize_cradle_run.py in the project04-[username] folder and click the “triangle” button in the top right of vscode!
You can customise your simulation by modifying the values in the CSV file called newton_cradle_pends.csv located in src/. Before making the Newton’s Cradle, you can use any of the helper functions uniform_mass_newton_cradle, inelastic_newton_cradle, and elastic_newton_cradle to see the effects of uniform coefficients of restitution and masses on the system. We have provided you with a function called write_to_csv that takes in a pend_list and writes it to the CSV file called newton_cradle_pends.csv. You can also directly modify the CSV file and see the changes translate into your Newton’s cradle - so feel free to play around with the values and the number of pendulums! Make sure the values you pick for color and texture are in constants.py. Changing the values of theta and omega will not affect the simulation, think about why this is the case.
Task 8. Make sure to sign up for a DUE session! Please sign up for a DUE session here! The DUE sessions happen in the following days after the project is due!
Appendix: Physics Derivations!
The following physics is based on a pendulum that looks like this [2]:
Angular Momentum and Velocity
For a swinging pendulum, we care more about the angular physical attributes than the linear ones. Thus, we have to work with:
Angular Acceleration
\(\dot{\omega} = \frac{-g \sin \theta}{R}\) where $g$ is the gravitational acceleration and $\theta$ is the angle formed by the cord normal to the axle.
Discrete Updates of the angular velocity with the angular acceleration
\(\omega_{new} = \omega + \dot{\omega} \Delta t\)
Updating the angle using the new angular velocity
\(\theta_{new} = \theta + \omega_{new} \Delta t\)
Conservation Laws
The Newton’s cradle is defined by the collisions between its pendula. The entire system should conserve kinetic energy in an elastic collision and conserve linear momentum (during a collision, we can approximate the momentum to be linear). We can approach the entire sequence of pendula in a pairwise manner, so we only consider the collision of two pendula. The two equations we have to take care of are:
Conservation of Linear Momentum
\(m_1 v_1 + m_2 v_2 = m_1 v_1^{new} + m_2 v_2^{new}\)
Conservation of Kinetic Energy
Kinetic energy is a little tricky to conserve when there is an elastic collision. We ask you to take in a quantity called coefficient of restitution $e$ which determines the “level” of inelasticity of a collision. If $e = 0$, it is a perfectly inelastic collision (kinetic energy not conserved), and if $e = 1$, it is a perfectly elastic collision (kinetic energy is conserved). We define:
\[e = \frac{v_2^{new} - v_1^{new}}{v_1 - v_2}\]Then, combining these equations, we can update the velocities of the objects post-collision as follows:
\[v_1^{new} = \frac{m_1 v_1 + m_2 v_2 - m_2 e(v_1 - v_2)}{m_1+m_2}\] \[v_2^{new} = \frac{m_1 v_1 + m_2 v_2 + m_1 e(v_1 - v_2)}{m_1+m_2}\]If we start off using angular velocities $\omega$, we need to convert them to linear velocities $v = R \times \omega$ for this equation, and the new calculated velocities can be converted back to angular velocities with the same equation.
Honor Roll Challenge
If you would like to challenge yourself even further, we have designed problems that that go beyond the course’s typical level of complexity. While these problems are entirely optional, we think some of you might enjoy pushing your limits. We will offer several of these challenges throughout the course assignments but you are in no way expected to complete them. You should expect much less guidance for those problems and cannot utilize TA Office Hours as our priority is to support students working on the main project. For general guidance or additional questions, please attend Professor Blank’s Office Hours.
If you’re still reading this, you have implemented the most basic version of the Newton’s cradle: a series of pendulums that collide with each other. However, we can add more degrees of freedom to the system to make it a little more complicated. For instance, we can make each element of the cradle a double pendulum, such that the first pendulum (cord1 and bob1) starts oscillating with angle theta and the second pendulum attached to it (cord2 and bob2) starts oscillating with angle phi.
Here is a picture of what we have described:
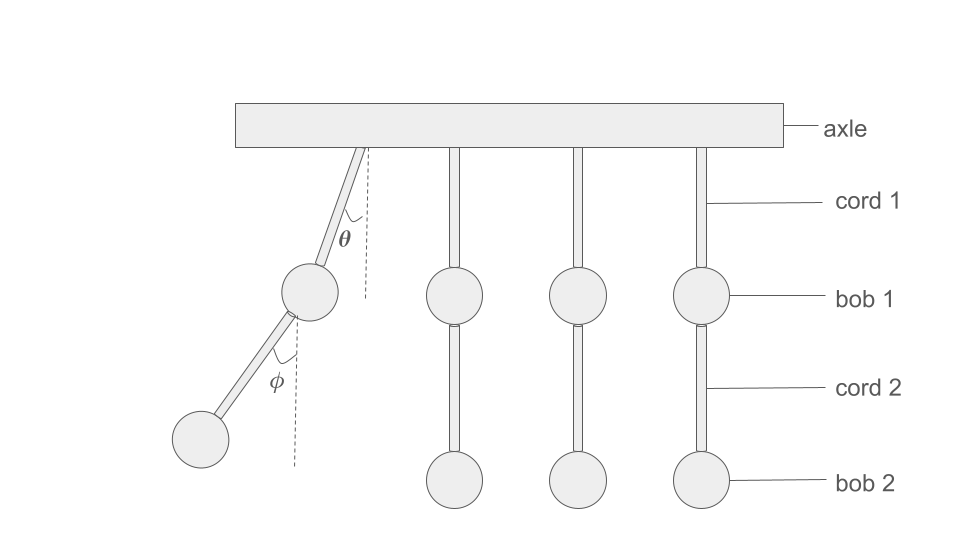
The next few steps to convert your Newton’s cradle into a double Newton’s cradle are:
- Define a
make_double_pendulum()that makes the double-pendulum structure with correctly calculated positions for all the components - Take in a
THETA_INITas well as aPHI_INITto define both angles of your double pendulum - Define a
double_angle_update()that updates both angles of the pendulum. Here, it is important to choose a valid reference frame - if you are looking at the entire system from a ‘lab frame’, the total angle of the bottom pendulum will actually be the sum ofTHETA_INITandPHI_INIT, but you can choose whatever reference frame works best for your understanding. You should update the positions accordingly.
Feel free to write any helper functions that make sense to you. You will likely have to do more work than described above (with slight changes to functions you have already written previously) to actually get the double pendulum to work as you expect it to.
When you demo your code, make sure your A tests still work before showing us your Honor Roll demo.
References:
- https://sites.ualberta.ca/~dnobes/Teaching_Section/Simulations/Newtons_Cradle/Simulation/Cradle.pdf
- Image credit: Khan Academy, “Trig and forces: the pendulum”. https://www.khanacademy.org/computing/computer-programming/programming-natural-simulations/programming-oscillations/a/trig-and-forces-the-pendulum