Reading Test Output
Tests can verify code does what is expected. Tests can also provide information to you, the programmer, about where and how code breaks. In this class, we’ve tried to make our tests as useful and accessible to you as possible, while also not straying too far from what you might encounter in another environment.
To run the tests for project, you should click on the beaker symbol on
the left side of Visual Studio Code, and look for the item labeled projectP-USERNAME,
where P is the number of the project, and USERNAME is your access.caltech username.
Hover your mouse over projectP-USERNAME and click the ‘Run’ button to start the tests
(the triangle that looks like a “play” symbol).
The ‘Run’ button with a little bug in the corner runs the tests with a debugger. Debuggers can help you get even more information about what your code is doing! You’ll learn more about debugging if you take CS 2.
The file icon with an arrow shows what code is being run when you click the play button. There’s no magic going on here, just more code!
That projectP-USERNAME item also acts as a drop-down menu (with the arrow on the left),
which allows you to run specific tests.
Reading Test Results
When you run the tests, you’ll get a window that looks something like the image below.
On the left side, you can see which category of tests ran, and run additional tests. On the right side, you can see the results of each individual test. Tests stop running after the first failure.
You might have an infinite loop in your code; i.e., a section of your code might never stop running, and so the test won’t stop running.
You might want to double check any while loops you have, but if you aren’t sure what to look for,
feel free to come to Office Hours!
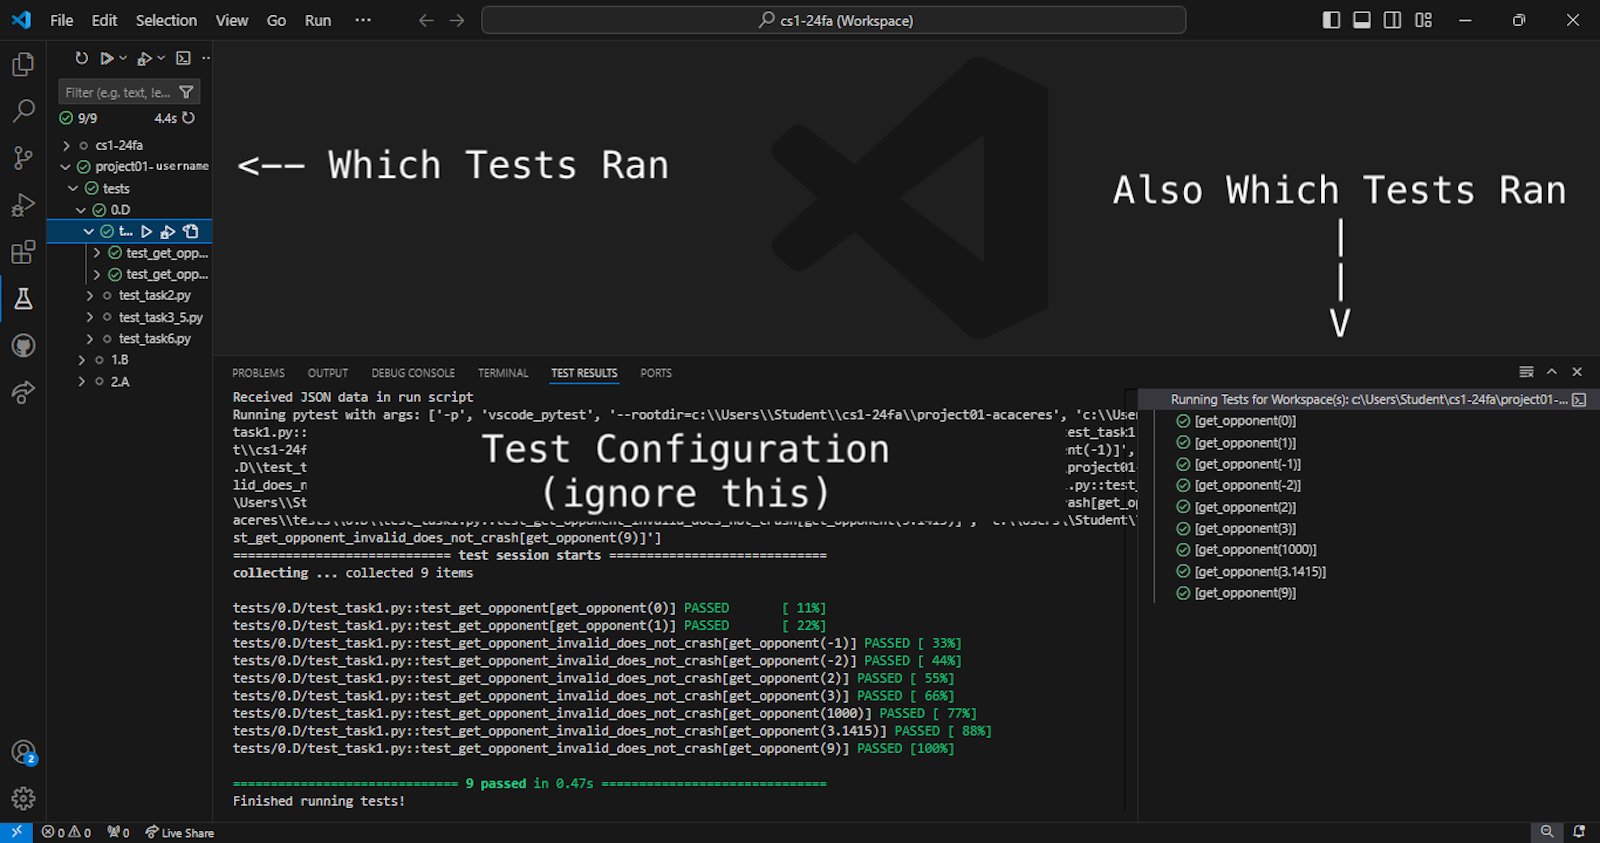
The body of what you need to look at is under === test session starts ===.
If all goes well, you’ll see a summary of the passed tests, as seen above.
If your test fails, there are a few different things you might see.
In general, the most useful information comes from the lines labelled E
and the lines just above it.
Example A
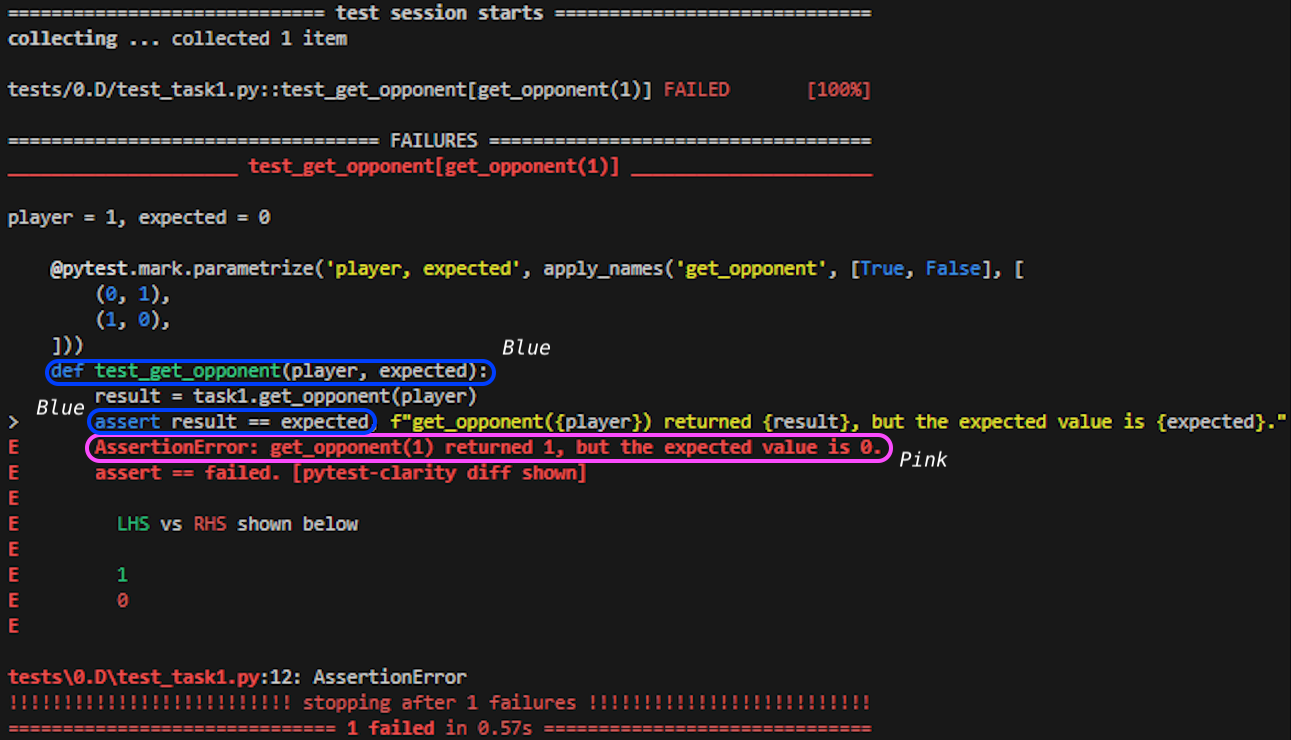
Above is an example of an Assertion Error.
Usually, this means your code didn’t pass our tests.
You can verify this by looking at the sections circled in blue in the image.
test_get_opponent is the function that failed,
and it failed on the line assert result == expected.
So, in this example, one of the tests for the get_opponent method failed.
The most helpful feedback you’ll find in the section circled in pink:
AssertionError: MESSAGE.
That MESSAGE contains information about how your code failed the tests.
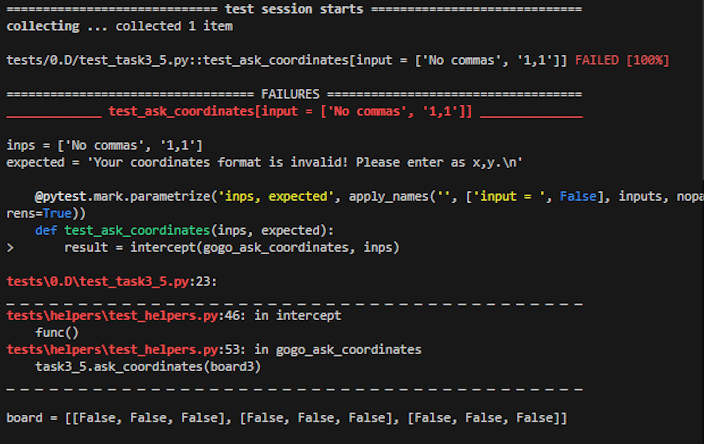
On the other hand, your code might cause an error to appear.
Example B
 Beginning of Test Output Above
—
End of Test Output Below
Beginning of Test Output Above
—
End of Test Output Below
There’s a lot of stuff to look at here, so you want to parse what’s most useful first.
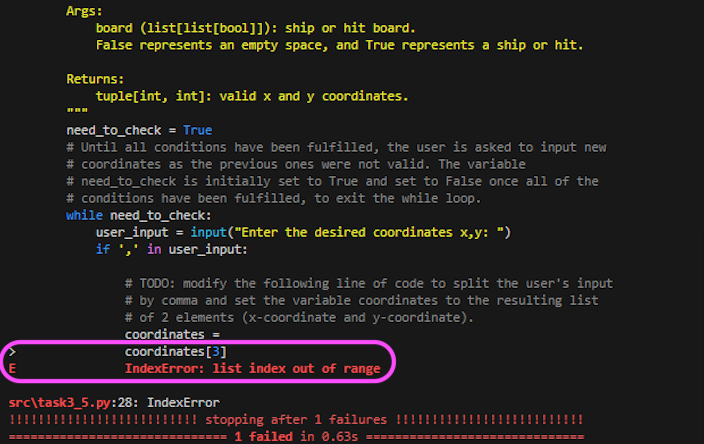
Again, look at the line labeled E and anything right above it.
In this example, the error is an Index Error, with the message list index out of range.
The code causing the issue is right next to a TODO, so this is something that needs to be modified
(or fixed, if you already modified it).
Remember, those TODOs should not be in your final submission.
Now that you know where the error is coming from, you can see that the rest of the code provided is providing more context for where the error occurred. A lot of this isn’t helpful to you right now, but as you work with larger projects, with functions that are calling each other, it may become relevant.
If you have any questions about anything covered here, feel free to come to Office Hours! Any of the TAs are happy to help you read error output that’s difficult to understand.
Running Specific Tests
The drop-down menu under projectP-USERNAME allows you to run and see results for individual tests,
from “all the test in the project” down to “just this specific input”.
The results are listed in the symbols next to the item.
As an example, we’ll use a set of results for all the tests in Project 1.
The top two items: project01-USERNAME and tests, both represent all the tests in Project 1.
Later tests may depend on previous tests, so you generally should run all the tests for a project; but running more specific categories is available, which might be helpful if earlier tests take a long time to run.
Items 0.D, 1.B, and 2.A represent the D, B, and A tests.
You can use these items to run any individual category of tests.
Each project has a set of tests that correspond to a letter grade,
and you must pass all the tests in category l to receive a grade of l or above on that project.
(For example, you must pass the D tests to receive a grade of D, B, or A.)
Under 0.D, we can see the items test_task1.py, test_task2.py, test_task3_5.py, and test_task_6.py.
These items allow you to run tests for individual tasks as you work through the project guide.
In this example, the tests are for task 1, task 2, tasks 3 through 5, and task 6, respectively.
Under test_task1.py, there are two functions test_get_opponent and
test_get_opponent_invalid_does_not_crash.
Functions test different things, and we try to use self-explanatory titles.
Under test_get_opponent, there are two items: [get_opponent(0)] and [get_opponent(1)].
These test a function you write in a project on a specific input.
Here, you can see exactly what is being called.
The Drop-Down Symbols
You’ll see four possible symbols here.
-
 Indicates the test passed.
 -
 Indicates the test failed.
 -
 Indicates the test is still running.
 -
 Indicates the test was cancelled before it finished.
If multiple tests in a category have different results, the category symbol will be the most representative symbol for all the tests in that category.
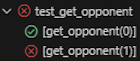
In the above example, the test [get_opponent(0)] failed and the test [get_opponent(1)] passed,
so the overall category failed.