Introduction
In CS1, you’ve learned to read, modify, and write code to build programs. For your final, we are not trying to test you on the concepts in the class.
Instead, we intend for this to be a cumulative demonstration of the skills you do have. Therefore, so you can see your program work in a real setting, we want you to modify the game of Minecraft using the plugin interface.
A Very Small Primer on Minecraft
Before we begin writing code, it helps to see how various things interact with each other in minecraft. Specifically, during this project, we will use the following Minecraft “features”/”concepts”:
- A block can be placed to take up physical space in the Minecraft world.
- A bucket is an item in your inventory that can carry and hold a block of water.
- Your inventory is the items you carry with you when you move; you can access it by pressing
eand dragging things around with your mouse. - Your “hotbar” contains items in your inventory you can access without
e, You can see them at the bottom of your screen, and can change which is selected by pressing the number keys1through9. - “Emptying a bucket” places a water block from a water bucket. After selecting the bucket in your hotbar, right-click on the block where you want to place it.
- “Dropping an item” throws the item onto the ground so another player can pick it up.
After selecting the item in your hotbar, press
qto drop that item.
Writing the Plugins
Typically, when you play minecraft, if you “drop an item”, it becomes available for other players to use…but not on the Caltech servers! We have installed (and given you the source code to!) a plugin which immediately removes an item from play as soon as a player drops it. Take a look at the IDidntNeedThatAnywayMod.java file which is a complete definition of a Minecraft Plugin (which we’ll colloquially call a “Mod” (and yes, we know this is technically incorrect).
Our mod uses the concept of an “event listener” where Minecraft tells us when an event occurs so we can respond to it. The astute student will recall that we used many of these in the Critters
environment in project06 (e.g., when critters were done mating). This is exactly the same thing! Just in a bigger world!
Your first task is to fix our mod so it does something less…stupid.
Since you are all working together on this project, we recommend you write your code directly on the Gitlab IDE as a group. That way, you won’t accidentally overwrite each other’s code. All compilation will happen on our servers this time anyway.
Task 0. Find the line of code that actually destroys the item and comment it out.
At this point, you will likely want to try your change out on a real Minecraft server.
To do this:
- Save your edits on Gitlab,
- go to https://goldendoodle.caltech.edu/upload
- type your “group name” (the minecraft mob/monster name after the “-“ in your project), and
- click the submit button.
The website will respond with either errors in your code OR a success message that will result in the server restarting with the new version of your mod! Restarting the server might take a couple minutes; so, be patient! But, then, go to minecraft, and test it out!
Task 1.
Now, instead of deleting the item, we’ll transform it into an “arrow” instead. Every Item (and, Block, as we’ll see later) exists as part of the Minecraft world.
- To get the
WorldanItemitem is in, you can callitem.getWorld().. - You can get an
Item’s location with thegetLocationmethod. - You can add a new
Itemto a world by using the methodworld.spawnEntitywhich takes two arguments: aLocationand aType. - The “type” of an arrow is, perhaps unsurprisingly,
EntityType.ARROW.
Put all of this together to accomplish our goal. Then, try it out on the Minecraft server as before.
Now, we’re ready to accomplish our real goal. Minecraft doesn’t have enough turtle ponds. Or Turtles. The final (heh, get it?) goal of CS 1 is to make a mod that will spawn turtles into minecraft if the player constructs a pond.
Our definition of a “turtle pond” is any pattern of 8 stone blocks in a square with a water block in the middle. The construction order matters, though.
First, the player must construct the border of the pond (where else would the water go?), and then empty a bucket of water into the hole in the center.
Then, as if magic, your mod will make a turtle appear out of thin air!
The good news is that this mod is actually just a slightly more complicated version of the one you just wrote with a couple exceptions: 1) Instead of listening for an item to be dropped, we want to listen for a bucket to be emptied. 2) Instead of always doing something when the listener happens, we only want to conditionally do it when the block we’ve emptied into is surrounded by stone. 3) Before spawning the new item, we want to delete the pond.
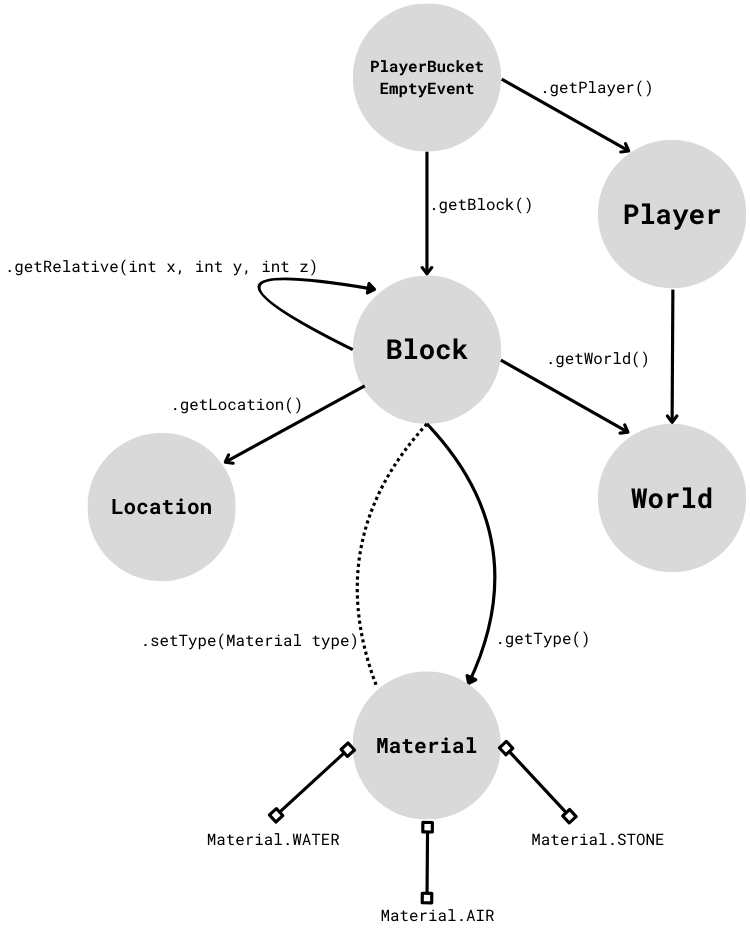
We’ve scoped out an approach for you in TurtlePondMod.java, and we strongly recommend you fill in the methods from top to bottom, as per the rest of this guide.
The trickiest part of the remainder of this project is how to “get” one type of thing from another type of thing. We’ve encapsulated the relevant methods and their arguments into the following diagram. This diagram is the most important part of this guide:
Task 2.
Write the isPond(Block centerBlock) function in TurtlePondMod.java.
This method should check that centerBlock is a water block,
and is in the center of the pond pattern shown below.
Hint: In Minecraft, the Y axis is the vertical/height axis, and the X and Z are the two horizontal axes.
Task 3.
Write the destroyPond(Block centerBlock) function in TurtlePondMod.java.
This method should remove all the block in the pond pattern.
Hint: The best way to destroy blocks is with setType and AIR.
Task 4.
Use all your previous methods to write onBucketEmpty(PlayerBucketEmptyEvent event)
in TurtlePondMod.java.
Hint: This method is called whenever a bucket is emptied. You need to finish the method according to the steps described above.
Task 5. Now, you’re theoretically all ready to test your extension. There’s just one problem! How does Minecraft know that it exists?
Hop over to MainPlugin.java and add the relevant line to the onEnable method.
Yay!
Task 6. Upload the code to your server by entering your group name into https://goldendoodle.caltech.edu/upload.
Task 7. Hop on your Minecraft server to test!
You can give yourself the necessary blocks using the following commands (Press ‘T’ to start typing).
@s refers to yourself as a player.
1
2

/give @s minecraft:stone 8
/give @s minecraft:water_bucket 1
If you place the blocks in the pond pattern, placing the water bucket last, you should see the blocks disappear after a slight delay and then a turtle should spawn.